Disclaimer
All content found in this work, including: text, images, audio, or other formats were created for informational purposes only. The Content is not intended to be a substitute for professional medical advice, diagnosis, or treatment. Always seek the advice of your physician or other qualified health provider with any questions you may have regarding a medical condition. Never disregard professional medical advice or delay in seeking it because of something you have read in this work, or on our website.
If you think you may have a medical emergency, call your doctor, go to the emergency department, or call 911 immediately. Seaside Companies LLC (SC) does not recommend or endorse any specific tests, products, physicians, procedures, opinions, or other information that may be mentioned in our publication or on our website. Reliance on any information provided by SC, employees employees, contracted writers, or medical professionals presenting content for publication to SC is solely at your own risk.
Links to content not created by SC are taken at your own risk. SC is not responsible for the claims of external websites and education companies.
"I was in terrible pain, herniated multiple discs in my back while power lifting, and couldn't even get out of bed. But doing this 8-minute stretch 3x per day helped me to take my life back from back pain. I started doing it every single day. And I'm back in the swing again... Let me share it with you."
While I was lying around injured for months, I found myself digging deep, reading, and learning new ways to circumvent my back pain. I took the same approach I used when learning to assist professional team orthopedic surgeons during surgery, and applied that knowledge to this guide. This simple exercise has been perfected with years of practice and study. I hope it's helpful.
***Follow the stretches in succession. There's a reason they're ordered this way.***
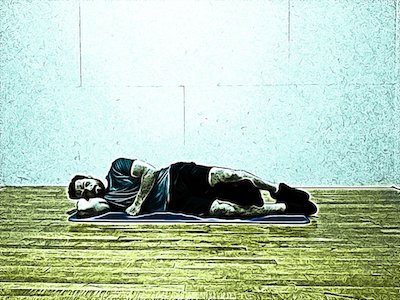
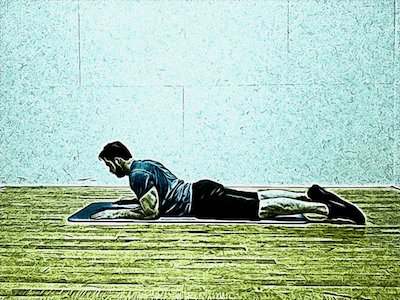
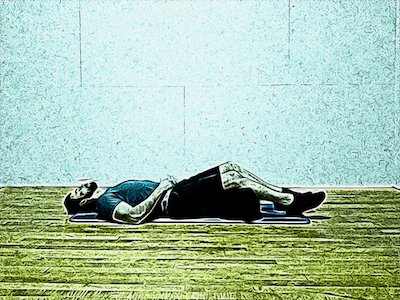
STRETCH #1
LYING REVERSE HYPEREXTENSION
First, I do this stretch to engage/strengthen my glutes and lower posterior core muscles.
1) Lay flat facedown on the ground.
2) Position your arms in front of you as if you're doing a 'superman'. (Grab/claw the ground to reach your arms forward and stretch your torso in full-extension. Tip: if it's difficult at first, you can place your hands beside your body as shown in the below images)
3) Now point your toes. Then extend and raise one leg up off of the ground, with minimal bending at the knee (if at all).
This stretch works by elongating the torso and strengthing/activating your pelvic stabilizers (the most common cause of back pain across the board).
(While reverse hyper machines are great for doing this exercise, they can be cumbersome. And this simple version is much more accessible; i.e. you can do it anywhere there is a floor.)
It's most effective when doing 3-4 sets total (of 10-15 successive repetitions per leg) while resting for a minute or two in between.
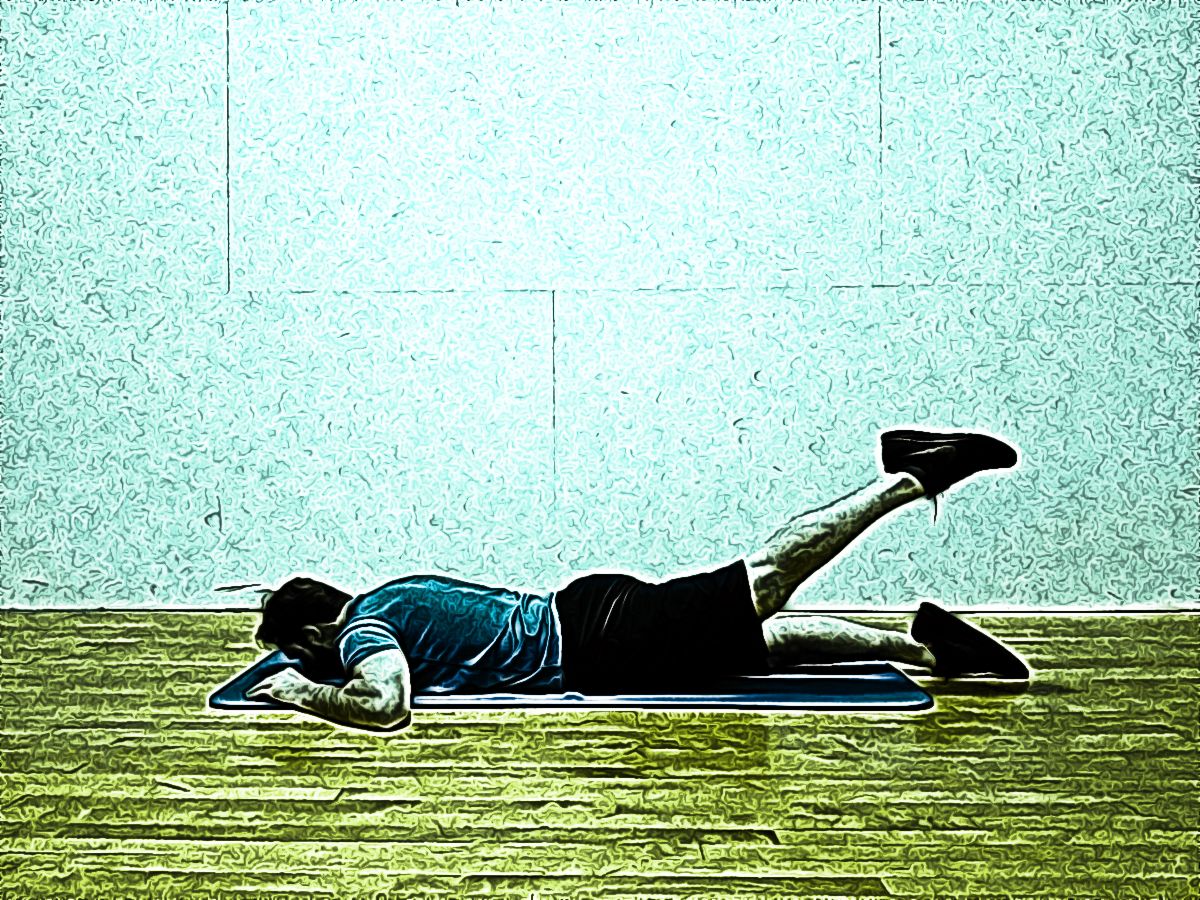
LYING REVERSE HYPEREXTENSION
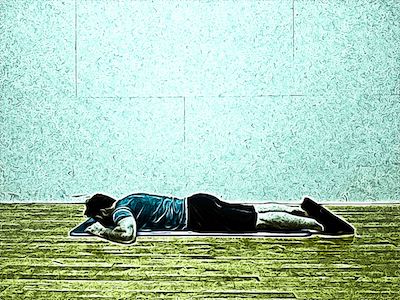
Lay on the ground face down. Position your arms in front of your face, and grasp at the ground to stretch your torso longer. (Or you can position your hands as shown in the picture above if it's too challenging at first.)

Raise one leg up to the sky, with your toe pointing downward. Mindfully focus on contracting your glutes and lower back to lift your leg. (minimal bending at the knee)
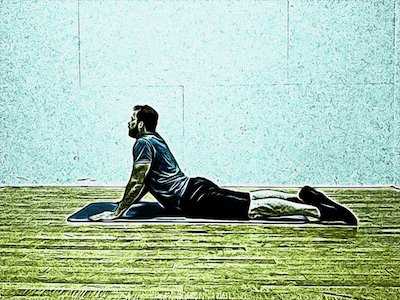
STRETCH #2
MODIFIED COBRA POSE
Second, I do this stretch to elongate and lengthen my lower back. (It's slightly different than the cobra pose in yoga)
1) Lay flat on the ground face down.
2) Position your hands flat on the ground. (As if you're preparing to do a push-up.)
3) Push-up and out, while keeping your pelvis in contact with the floor.
This stretch works by elongating the torso to relieve pressure on the lower and mid-back (lumbar/thoracic). Pull your upper body out and away from your pelvis, holding it at the peak for a moment. Keeping your hips on the ground throughout the motion. And look up as you stretch out/upward. ONLY GO AS HIGH AS YOU COMFORTABLY CAN GO. If it's a struggle you can just come to rest on your elbows until working your way higher in time. (Sometimes your feet and legs will even slide forward if you're doing it right.)
It was most effective doing 3-4 sets total (of 8-10 successive repetitions) while resting for a minute or two in between.
MODIFIED COBRA POSE

Laying on the ground face down, slowly press upward with hands flat, lifting the upper body slowly and mindfully.
If it's challenging at first, just go high enough to rest on the elbows for a moment, and then slowly work up higher over time.
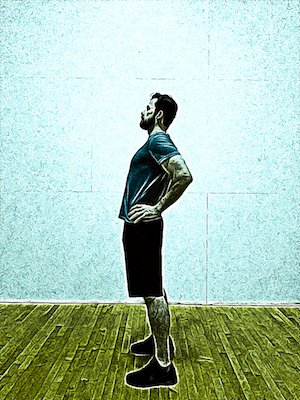
STRETCH #3
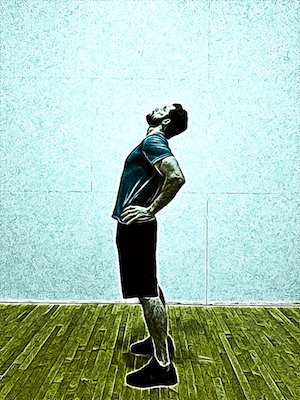
STANDING PELVIC PRESS
Third, I adjust my posture using this standing stretch. (I use this one regularly throughout the day.)
1) PREP: Bounce at your knees and wiggle your hips to limber your body while standing. Position your feet just slightly less than shoulder-width apart. And point your feet/thumbs directly forward. (Not inward or outward).
2) STANCE: Press your heels into the ground, while flexing your glutes and butt. Thrust forward from the bottom. (Curl your pelvis forward from the bottom, or pelvic floor. Do not stick your butt out. Squeeze forward instead.) Then suck your stomach in tightly (30%). And force your chest/head to grow wider and taller (upward).
3) PRESS: Place your hands on your hips. Point your elbows straight backward (far back). Press your thumbs deeply into the dimples of your lower back/pelvis.... Now lean back slightly, flex your glutes, and press your pelvis forward from your thumbs. Look upward as you lean and press your hips forward.
(You might get a pop. I get one nearly every time I perfrom this stretch.)
STANDING PELVIC PRESS
Losen your body and find a comfortable stance. Withy our feet just less than shoulder-width apart.
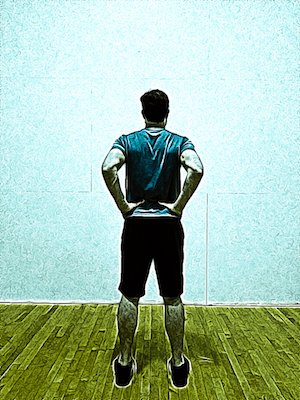
Now, swing both elbows to point backward.
Place your hands around the waist in the shape of a "C". Using both thumbs, find the dimples of your lower back and press in until you feel the bone of the pelvis (or iliac crest).
I HOPE YOU ENJOYED THIS 80/20 VERSION OF HACKING BACK PAIN
The above three steps are the most vital part of the stretching routine. They represent the overall best stretches I found while building the program. (Doing the first two stretched alone, literally began relieving my pain immediately. And I was able to start standing and doing the third exercise in no time... I hope this helps you.)
A MORE IN-DEPTH GUIDE OF HACKS
While researching to hack my own back pain, I discovered a lot of really useful info. Also, some alarming statistics.
5 ALARMING BACK PAIN FACTS:
#1 *** 8-in-10 people will experience back pain in their lives. (80%!!!)***
#2 *** Globally, lower back pain is the SINGLE leading cause of disability. ***
#3 ***Over 750 million people suffer from regular lower back pain.***
#4 ***Back pain is the SECOND most common reason for doctor visits.***
#5 ***Americans alone spend more than $90billion each year treating back pain. And that doesn’t include the cost of productivity lost due to pain and time off.***
HOW AND WHY??? (EBOOK / VIDEOS / WORKSHOPS COMING SOON)
The very back issues I suffer from, are literally shared by millions of people. Back pain is a global epidemic in the technology age. And it's the #1 cause of disability worldwide. The primary culprit is simple, modern life. Our bodies didn't evolve over thousands of years to ride buses, sit in cars, stare down at screens, and sit at desks all day.
What allowed me to take my life back from back pain, was truly understanding why I was in pain, and learning to apply simple solutions in my daily life. If you take only one thing from this guide with you, it might change your life.
"When I found my self glued to the floor, writing in pain, I needed to know what was going on. I was sick of guessing when the pain would show up again. So I took it into my own hands, invested hours of research and years of practice to make this little program for you. I've shared it with my own friends and family seeking help. And it truly allowed me to take my life back from back pain.
Thanks for reading...
(I'm not a medical professional, nor am I claiming to be. This work is strictly for informational use. If you think you may have a medical emergency, call your doctor, go to the emergency department, or call 911 immediately. See the disclaimer above for more.)
EXTRA TIP
Here are a couple of extra helpful recommendations for laying/sleeping that worked for me.
Sitting does more harm than good. Even when it seems like a comfortable position, sitting is actually a BIG part of the problem. (Sitting creates measurably higher weight forces on the mid-lower spine. Even more so than standing. And lying down is better than both for reducing pressure.)
By placing a thick pillow, or two, under the knees when lying on your back, it eases the pressure even more.